Ceilings play an important role in the safety and aesthetics of any home. When they are damaged, identifying the problem correctly and responding appropriately is critical.
Cracks in the ceiling are common, often caused by structural settling or temperature fluctuations. Addressing underlying issues like water stains or sagging is key to managing these problems. Contact Ceiling Repairs Perth for expert assistance.
While cracks in the ceiling are certainly worrisome, it’s important to understand that they do not always indicate serious structural damage. Many cracks are simply a sign of normal home settling and can be repaired without much fuss. However, cracks that appear to be growing rapidly or are accompanied by sagging are a serious concern that must be addressed by a professional right away.
Cracks that are a result of natural settling usually appear along the edges of the ceiling or in areas where the ceiling meets the walls. These are often caused by changes in temperature and humidity that cause wood to expand and contract. They may also be the result of a building on reactive soil that has changed over time, or they can be a symptom of a more serious problem with the foundation of the house.
The location of the crack is also a significant factor. Hairline cracks in the edge of the ceiling are more likely to be the result of normal settling, while large cracks running across the middle of the ceiling are a more serious indication of potential structural problems that should be addressed immediately.
Small cracks that don’t show any discoloration can usually be repaired with caulk or putty, while larger ones should be patched and then painted to match the rest of the ceiling. If the cracks are accompanied by water damage, a plumber should be called to investigate and fix the leak.
When repairing large holes, the first step is to add support in the form of wooden cleats to prevent further damage to the surrounding wall or framing. Then, the hole should be filled with setting-type joint compound, allowing each layer to dry thoroughly before applying the next. After the patch has been sanded smooth and is ready for paint, a quality primer should be applied and then the same color as the rest of the ceiling.
Although it is possible to repair many ceiling issues yourself, hiring professionals ensures that the job is done correctly and quickly. It is also the best way to be certain that the structural integrity of the home is not compromised during any repairs, especially if the cracks are a sign of serious problems with the foundation of the house.
Water Stains
Water stains are a clear indicator of leaks or moisture issues in your home, causing damage that can be both cosmetic and structural. Addressing these problems quickly is essential to preserving the value of your home and maintaining a safe living environment.
Water staining can be caused by a variety of sources, but the most common is a roof leak that seeps through rafters or ceiling decking into the rooms below. Other causes can include leaking pipes or plumbing fixtures, or condensation from your air conditioning system. Staining typically appears as dark brown or even black discoloration that may be accompanied by sagging or bubbling plaster and peeling paint.
If you notice water stains on your ceiling, it is important to act promptly. Left untreated, the moisture in your attic can cause mold and mildew to grow, which poses health hazards for you and your family. In addition, the moisture can cause sagging or other structural damage that will require costly repair to your home’s integrity.
In many cases, water stains can be repaired with a simple procedure. First, it is essential to identify the source of the stain and fix it. This can be done by visually inspecting the attic and roof for signs of water leakage, including wet insulation or rafters, as well as feeling around for sagging drywall or damp spots. It is also a good idea to feel behind the ceiling to trace any plumbing lines that may be leaking.
Once the source of the leak has been addressed, the stain can be bleached and then repainted. Choose a paint color that closely matches the rest of your ceiling for a seamless look. It is recommended that you use a primer specifically designed to cover water stains to ensure the stain does not bleed through the paint.
Regular maintenance of your ceiling can help to keep it looking good for years to come, but some issues will need a professional touch. If you notice any problems with your ceiling, contact a local contractor for a comprehensive inspection and recommendation on the best repair approach.
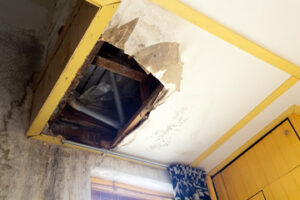
Holes
Holes in the ceiling are more than just unsightly; they can also be a sign of more serious problems. Small holes can be fixed with spackle and joint compound, while large ones may require drywall replacement or even an entire ceiling removal. Whatever the cause, it’s important to address any drywall issues immediately to prevent further damage and ensure the safety and longevity of your building’s structure.
Fixing a hole in the ceiling is a relatively straightforward job, but there are some key points to remember. First, make sure you have the right materials, including a ladder and safety goggles that fully cover your eyes as dust and debris will be flying around while you work. It’s also helpful to have a step stool or chair to help you reach the ceiling and work comfortably.
Next, it’s essential to use the correct type of joint compound for a ceiling repair. There are two types of joint compounds available: setting and non-setting. Setting-type joint compound dries faster and shrinks less, making it ideal for ceiling repairs. It’s also better for high ceilings as it can help prevent cracking over time. Non-setting joint compound works well on walls, but it can shrink and crack over time when used on a ceiling.
Once you’ve applied the joint compound, allow it to dry completely before using a sanding block to smooth out any rough edges. After that, you can apply a coat of matching paint to finish the patch. If you need more than one coat, be sure to wait for each to dry before applying the next.
Aside from being an eyesore, large holes can also leave your home or business vulnerable to other kinds of damage. For example, a hole in the ceiling can expose exposed wood beams to moisture, which can lead to rot and other problems. Additionally, a hole in the ceiling can provide a place for pests to enter your space.
Ceiling repair can seem like a daunting task, but it’s essential to keep up with routine inspections and maintenance to prevent more extensive problems. Fortunately, addressing damage to the ceiling as soon as you notice it can save you time and money in the long run!
Peeling Paint
When paint starts to peel, it’s no longer just an eyesore – it may also indicate underlying issues. Addressing these problems promptly can help ensure the safety and comfort of your home’s occupants.
Fortunately, the general process for repairing peeling ceiling paint is relatively simple and straightforward. It begins with identifying the cause of the problem, which can include anything from moisture infiltration to improper surface preparation and environmental factors like high humidity or drastic temperature changes. Once the underlying issue is addressed, you can proceed to sand and prime the affected area, patch and plaster any damaged areas, and then repaint.
Before you start sanding, you’ll want to make sure that you have all of the necessary tools and equipment on hand. This includes a ladder and all of the proper safety gear, including a face mask, goggles, and a dust mask to prevent any paint or primer from contacting your lungs or nose. You’ll also want to open up any doors and windows to help ventilate the space as you work.
Once you have all of your safety gear in place, find the worst peeling area on your ceiling and start working. Be careful not to dig too deeply into the drywall as this could result in long-term damage, so begin by scraping off loose and flaking paint with your putty knife or scraper. Once the damaged areas are removed, sand the remaining areas of the ceiling to smooth out rough surfaces and create a uniformly smooth surface.
After sanding, clean the surface with a damp cloth to remove any residue that might have been left behind. This will help your new coat of paint adhere properly and last longer. Finally, apply a coat of oil-based primer to the surface to enhance adhesion and increase durability.
Now that the surface is prepared, you can begin to repair any cracks or holes in the ceiling with a good quality joint compound. Once the compound is fully dry, sand it lightly to smooth out any rough edges and then wipe down the surface with a rag to remove any remaining dust or dirt.